Guides Hub/Microoptimization

From Cosmoteer Wiki
Jump to navigation Jump to search

This guide is meant to give on overview on different strategies that can increase your ships performance or cost efficiency in minor ways. The information provided is mainly useful for various pvp game modes as crew efficiency is not really considered but would often be more important factor in career. Keep in mind that every change is a trade-off and can have side effects that make it worse.

Armor Arrangement

Weaved armor

Armor weaving

There is an optimal way to place your dense armor: Laying 2x1 pieces in a brick like structure. This will for example require an ion drilling through to hit a lot more pieces of armor than in other setups.

Armor pieces

That is actually the best armor piece to use in each scenario? That is more complicated to answer than it might seems as every armor block has a different penetration resistance. In practice 2x1 armor blocks and 1x1 armor wedges are the best options in most cases. 2x1 is more compact, but 1x1 has more penetration resistance and is more cost-efficient in that way.

Example of how to use triangle armor. 1x1 triangles are on the outside and provide penetration resistance. 2x1 blocks hold them together (instead of structure which would be less cost efficient). All the remaining 2x1 pieces are put on the inside. This keeps the armor as compact as possible. The corners are rounded with using some 2x1 pieces.

3x1 wedges can actually be woven in a way that spreads out damage more effectively than with 2x1 armor, but the bad pen resist stat holds this layout back. Ships sometimes use 3x1 as spaced back armor. That way it protects against hitscan pretty well and it often slows projectiles down enough that they can not jump the spacing from the armor to the rest of the ship.

Example of an armor weaving using 3x1 triangles. It really is better against hitscan weapons like ions but the horrible penetration resistance and the lack of compactness make this setup a bad choice.

Other armor pieces have their uses mainly to smooth out corners as lower friction is often an advantage.

Auto Ram

Your structure line for autoram should have a length of 2 building grids.

Explanation

When giving an autoram command, you'll often want to rotate the target position. For that, it is easier the closer the target position is to the ship, since your cursor will be close to it after selection.

So when setting up autoram you want a structure line that's long enough that the AI does not stall its thrust but as short as possible so that giving rotation commands is easier. It also seems smaller ships may be less susceptible to this issue.

Testing reveals that a line length of 2 vanilla building grids works well for the smaller domination ships (using Developer Mode to see what thrust is firing at what strength).

You will probably want to have it quite a bit longer for orbiter walls since those are bigger and do not need rotation commands.

Crew

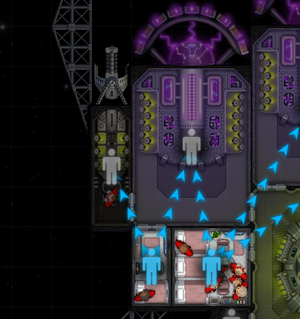
Crew bug in action: The cockpit operator gets reassigned and can not operate anymore (operators are white)

Avoiding crew bug issues

Crew bug is the following: If a quarter gets destroyed, the crew assigned to it is still alive and there is a second quarter with empty spots available, the crew will be reassigned to this quarter. This is especially devastating when it causes a ships control room operators to leave.

Some ships that utilize crew detach do not detach their control room operators so that it can not be reassigned.

Other ships completely avoid reassignment issues by detaching every single crew quarter.

Avoiding separation bug issues

Whenever 2 or more ships are separated, the lower cost ship(s) crew gets unassigned from their quarters and they get reassigned shortly after. This can cause issues when:

  • The hiring priority of crew is not all the same; The majority of operators will leave their posts for a while, leaving your ship immobilized and unable to fight back. Setting the hiring priority of all crew roles to the same thing fixes this.
  • You do crew detach at the same time as your ship is separating; Most of your detached crew will be reassigned along with the crew that is on board. You can solve this by waiting with the crew detach until after all crew on the separated ship has been reassigned.

Bunks Quarters and Barracks

You should try to use the bigger crew rooms as much as possible, as they are more cost-effective. This makes some logistical tricks not possible, but is preferred in most cases anyway.

Fire Extinguishers

You should always assign your crew to Fire Extinguishers because they won't be able to switch tasks to it otherwise. (That's an issue if all of your crew is occupied while there is fire on your ship)

Compactness

Being compact is a major advantage:

  • Smaller surface are means that you need less defenses for your ship.
  • The mass being closer to the center means that you will gain more rotational velocity.
  • You generally have shorter supply routes.

You get more compact by:

  • Build as close to the thrust exclusion zone as possible. Sometimes you can get closer by rearranging some crew quarters.
  • Not using triangle armor

Pretask

Eb trick useage on an ion rammer

Even small amounts of energy consumers may be used to pretask. The most widespread way to do this is the "EB trick" commonly utilized on ion rammers. It just uses the EB next to the shield for a tiny increase in sustainability.

Resource distribution

Factories, sulfur and iron are placed to minimize crew travel time. It has slightly worse damage control than a double "L" setup since the explosive sulfur is also closer to the center of the ship. It also has worse maximal travel distance.

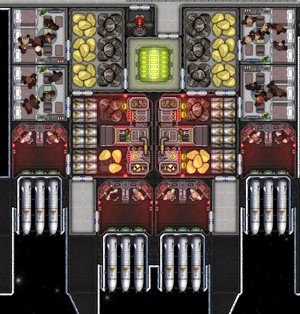
You should be mindful of which way your resources are placed and factories are orientated. Here is an example of a missile module.

Testing

Here are a few ways you can test your ships logistics.

  • Calculate energy costs: You can add up all the energy requirements of parts and compare them with the supply from reactors assigned to them. This is a good indicator, but should not always be taken at face value. You can often strain reactors much more than the numbers might indicate as there might be frequent downtimes between engagements. Examples:
    • Shields require much more energy than indicated as they get drained upon receiving damage.
    • Tractor beams need much less energy because their drain changes with distance.
  • You can also test energy requirements and system uptime experimentally. Autofire all thrusters and weapons to see how well they sustain. If you want to test tractor beam sustain you can spawn an asteroid and set a tight movement command.
  • You can enable Developer mode and enable hitboxes. This can help you figure out if a small shield covers the turret above or not.

Walkways

Make sure you know how crew works before reading this.

Walkway Orientation

Walkway direction.png

Your walkways should face the same direction that the crew entering the tile is moving in:

The increase in movement speed is pretty small, but it's there.

Tile Entries

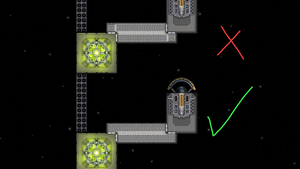
Notice the entry to the reactor:

When making walkway supply lines to a tile, you'd ideally always enter using one side of a corner and leave through the other (like above). This is because it minimizes the amount of non walkway tiles crew has to travel through.

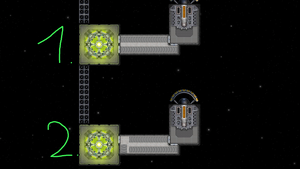
But sometimes using the corner is not possible. In this case, there are 2 possibilities:

1 has fewer crew congestion, but is otherwise slower and 200 credits more expensive than 2. 1 and 2 are very similar in performance, so it depends on the rest of the ship what setup should be preferred.

Not Using Walkways

In many cases using walkways is not the most cost-efficient setup. You mostly need them to give parts that quickly run out of energy better uptime. If the energy consumer is depleted fairly slowly (like railguns, capacitors, etc...) you should try and see if corridors and a bit more crew can still get the job done.

Weight distribution

There are parts where you have some flexibility on where to place them. Good examples are Operator crew quarters and thrusters which are attached to engine rooms. You can place those close to the center of mass for higher turning speed.

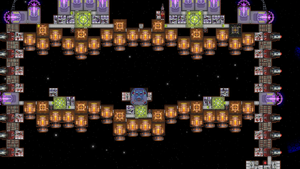
Thruster placement on an UL nuke orbiter. Notice how the top thrust is in the lowest place possible and the bottom in the highest place possible (except for some places where it's suboptimal for other reasons).